Frametile
How do you remove an image background with an API?
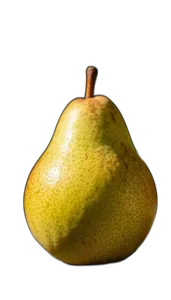
Add e_background_removal to the image URL. Frametile cuts the subject out of its background, keeps the transparent pixels and returns a PNG. The shorter t_bg-rem does exactly the same thing. There is no upload step, no job to poll and no callback: the URL is the request, and the response is the cutout.
https://frametile.com/api/YOUR_API_KEY/images/fruit/pear/e_background_removal
https://frametile.com/api/YOUR_API_KEY/images/fruit/pear/t_bg-rem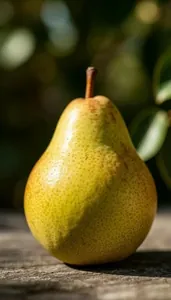
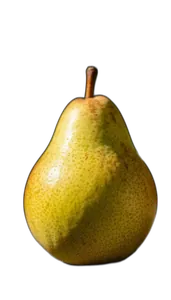
The chequered pattern behind the second image is the page showing you where the transparency is. On your own site, whatever sits behind the image will show through.
How does AI background removal work?
It is a segmentation problem. A neural network looks at every pixel and decides whether it belongs to the main subject or to the background. The pixels marked as background become transparent, and the edge pixels get partial transparency so the cutout does not look jagged.
Frametile runs the open-source rembg model on its own server. Your image is not sent to a third-party removal service. If the model is not available on a server, Frametile falls back to a simpler method that reads the colour at the image edges and removes it. That fallback works well on product shots against plain studio backgrounds and poorly on busy scenes.
The first request for a given URL runs the model. The result is then stored, so every later request for that exact URL is served from storage instead of being generated again. That matters for removal in particular, because running a neural network is far more work than a resize.
Why is the result a PNG, and can you get JPEG?
JPEG has no transparency. If a cutout were saved as JPEG, the empty area would have to be filled with a solid colour, which defeats the point. So when the result has transparent pixels and you have not asked for a format, Frametile returns a PNG.
PNG is lossless, which also makes it large. In our own measurements on the sample pear photo at 480 pixels wide, the PNG came out at 439 KB against 63.6 KB for a JPEG (full numbers here). Two ways to keep cutouts light:
- Resize before you remove. Fewer pixels in means fewer pixels out, and the model runs faster:
w_600,h_600,c_fill/e_background_removal. - Flatten onto a colour when you do not need transparency. If the cutout will always sit on the same background, add
b_with that colour in a later step and choose JPEG or WebP.
Background removal recipes
Each recipe below is one URL. Steps run left to right, so the order matters.
| Goal | Transformation | Notes |
|---|---|---|
Plain cutout |
e_background_removal | Transparent PNG at the original size. |
Cutout for a product grid |
w_600,h_600,c_fill/e_background_removal | Crop to the tile size first, then remove. |
Cutout on a brand colour |
w_600,h_600,c_pad/e_background_removal/b_EEF0FC,f_jpg | The transparent area is flattened onto the colour, so JPEG is safe. |
Black and white cutout |
t_bg-rem-gray | A named shortcut for removal followed by grayscale. |
Cutout with a drop shadow |
e_background_removal/e_shadow | The canvas grows a little to make room for the shadow. |
Rounded sticker |
e_background_removal/r_40 | Rounded corners keep the transparency. |
Named shortcuts. t_bg-rem, t_bg-removal, t_bg-remove and t_bgremoval are all the same as e_background_removal. Use whichever reads best in your code.
You can mix a shortcut with other parameters, such as t_bg-rem,w_300. The full list is in the named transformations docs.
Where does automatic background removal struggle?
Any segmentation model, rembg included, is guessing what the subject is. It guesses well when there is one clear subject and less well in these cases:
- Fine detail at the edges. Hair, fur, lace and plant leaves can come out slightly chopped or keep a halo of the old background.
- Low contrast. A white mug on a white table gives the model very little to go on.
- Transparent and reflective objects. Glass, bottles and shiny metal pick up colours from the background, so parts of them may be removed.
- Several subjects. In a group shot or a busy street, the model may keep more or less than you expected.
What helps: shoot products on a plain background that contrasts with the item, keep the subject in sharp focus, and leave a little space around it. For a catalogue, run a handful of real photos through the URL before committing to the approach. It costs nothing but a few requests.
Common questions about background removal
Does removing the background change my original image?
No. The original you uploaded is the base image and is never modified. Every transformation creates a new image.
Is it slow?
The first request for a URL runs the model, so it takes longer than a simple resize. After that the stored result is returned. Resizing first, as in the recipes above, makes that first run quicker.
Who can request the cutout?
Every request needs a valid API key that owns the image or its folder. Your API key is part of the URL, so treat image URLs like a password and do not publish keys you cannot rotate.
Can I put text over the cutout?
Yes. Add a text layer in a later step, for example e_background_removal/l_text:Roboto_64_bold:SALE,co_white,g_south. See overlays in the docs.
More finished examples, including cutouts, are on the examples page. If you are also resizing, read how to resize and crop images by URL.
Try it on your own images
Upload a photo, copy its URL and start editing the URL. Every parameter above works the same way.